Sunday 14 September 2014

Bracelet stacking!!

When i first saw someone on the internet wearing a lot of bracelets on their wrists/arms, i was like 'that looks easy, even i can do that.' That was 2 years ago and for the love of god i still can't figure it out (-.- )

'Stacked bracelets' should look like this:
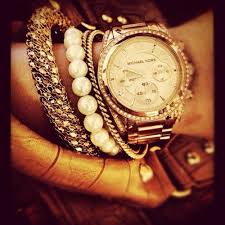


or this:


I guess now we have established how a perfectly stacked arm candies should look like. So let us take a look at my attempts.


Close enough? ;D
Do you have any tips on how to 'perfect' this technique? 'cause as you can see, i need help :D So do tell me about it.

Thanks for reading :)

Love,
Prerna.

Variation in head-band hairstyles (6 ways)

It is an easy up-do. And when i say easy, i mean the easiest one ever! All you'll be needing for this hairstyle is a comb and a headband! Can it get any simpler?
And all you have to do is:

1. Wear your headband.
2. Tuck/wrap pieces/chunk of hair from each side. (from sides to mid)

And that is it! Easy, right? Told ya so :D It is a great hairstyle for a hot weather. There can be many variations to this hair-style-

  • You can start from the very front, like this:


  • Or from behind your ears, like this:  


  • Or wear with a super-cute headband:


  • Or half tuck like this:


  • Or just a huge tuck of your hair like this:


  • Or like this tuck and braid:


I was browsing the internet to look for some cool hairstyles and found all of these pics. I thought that it was such an easy hairstyle and there were a lot of variations to it, which i personally find quite appealing. What do you think? Which one do you like the best?
I hope you liked this post :)
Thanks for reading :)

Love,
Prerna.

Friday 12 September 2014

Sorry D:

Today has got to be the worst day ever because a) i have a cold. b) i hate cold. c) google+ deleted many of my pics from the blog. FML. To everyone visiting my blog, i'm so so sorry. If you visited a 'pic-less' post of mine, trust me i didn't know. I didn't know that deleting back-up would delete my blog pics. (v . v) (that's me feeling bad)
I am trying to recover those photos (if that's possible) so please bear with me till then :'(

With all the love in the world,
Prerna.

Diy ripped boyfriend jeans

Yes, this is me trying to rock ripped jeans or so i think in this post :D I just 'ripped' some (3!) straight legged jeans of mine. It was super fun and once i started i couldn't stop.

You know how to dress these jeans? Its simple.
1. Throw on a printed flowy tee with a cardigan. Don't mind the mess on my bed (._.;) I am clearly not an organized person when 'the time to dress' comes!  

2. With a fitted striped high neck (?) top:
3. With a Crew-neck top, like this:
I know. Too much editing. But you get the idea.
These 3 are how i wear my ripped jeans. Personally, i like them. They are easy to dress-up or dress down, according to the occasion.

How to do the 'ripping', as i like to call it:

1. Cut 2 straight lines (of same length) in your jeans where you want the 'ripping'.


 2. Find the loose thread.


I am pointing to it.
3. Using a safety pin or needle (I prefer safety pins, no reason, okay?) pull-out the loose threads.


 4. Do so for the complete cut.


And you now have a 'ripping' in your jeans! Use this step anywhere on your jeans. Preferable areas are:

  • around the pocket
  • knees
  • mid-thigh
  • back pocket
  • on the fold of your jeans (if you fold them at your ankles)
Well, i hope you liked this post, if so, then leave a comment. :D
Thanks for reading :D

Love,
Prerna.

Wednesday 10 September 2014

Dye-ing (first attempt)

I made a list of the things i would like to make/do here: http://luckystar5.blogspot.in/2014/08/diy-inspiration-d.html
One of them was dyeing. To be honest i think its the easiest way to refashion any article of clothing (and the most fun way) but there is always the risk that the color is not going to be the one you want. It depends on the fabric. You must always test the color on a piece of that fabric you want to dye. It is not a fool proof method because the color may vary (dark/light) from the test fabric piece to the real one. And to be honest, the color depends on the fabric type (._.;)
Wanna see the clothing item i picked to dye?


Ta-da :D Surprised? Don't be, i always planned it to be my first :D Its just too... white?!
You know what color i chose to dye it with? Blue! I am into blue these days. Wanna see how it looks now?

Does it look blue? No? Thought so.


So what do you think about my not so white or blue cardigan? Looks better or not? Even if it doesn't look good, i have to stick with this 'version' because of obvious reasons (you can't change the color back!!)
Anyways, thanks for reading as always, hope you liked this post. :D

Love,
Prerna

Tuesday 9 September 2014

Pretty Wave-y Nail-art (no nail-art supplies needed)

So I haven't been completely useless the past few days. Don't blame me! I have been reading some manga! And you know how addicting that shit is! If you don't know, go to this link: http://www.mangahere.co/ And then you will know!
I would dedicate a complete post for them, but this ain't the one, because i have these really pretty nail-art that I'm dying to show!!

Blue and black, Oh no! Fashion disaster! Or not :D

What's needed?
  • Nail-paint - 2 or 3 colors
  • Clear nail paint
No nail-art supplies needed! Surprised? Even i was :D

What i did?
  • Apply the color you want. I chose-- blue :D What is with me and blue?
  • With the other color just make curved ends (like in the pic) and fill them (with the same color, of course)
  • Use clear nail-paint to secure it. I would recommend this step, I mean, come on, who wants to see their master-piece get ruined in a day?
It is officially my go to nail-art! And you can add as many layers as you want!! I know i use too many exclamation marks but that's how excited i am!!!
 
How pretty can you be?

So, that's it for today's post. I hope you liked it :) Please leave a comment or subscribe (fingers crossed)

Thanks for reading :)

Love,
Prerna